

With FeatureOS and JIRA integration, your team will be able to manage FeatureOS right on your organization's JIRA channel. This article includes the steps to install and configure FeatureOS and JIRA integration with workflow examples!
Prerequisites
If you are working on Safari, go to Settings → Privacy tab and uncheck Prevent cross-site tracking. We need this option to be disabled for JIRA to detect your FeatureOS login session. We apologize for the inconvenience, but this is a Safari-mandated feature.
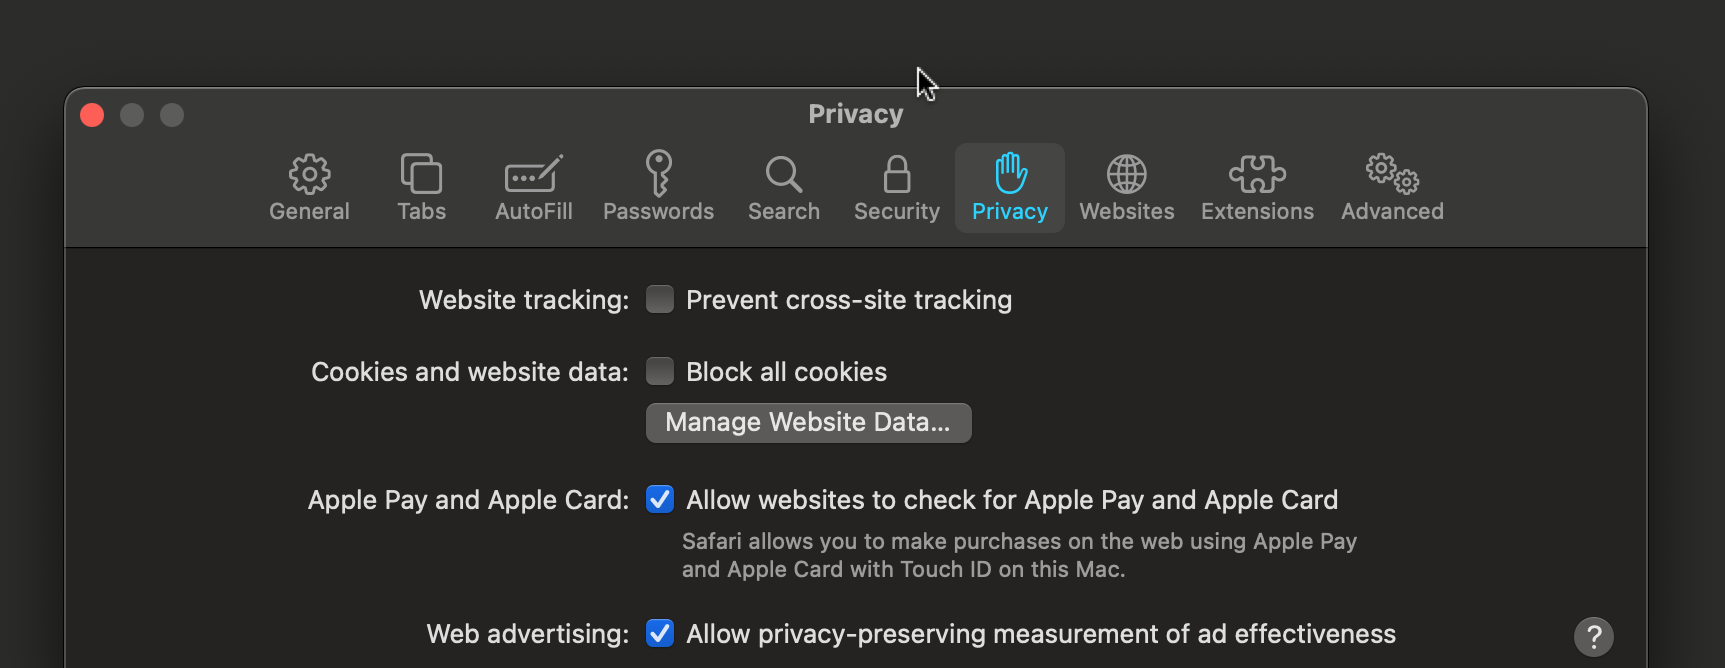
Or you could complete JIRA authorization up to Step 2 (Updating Configuration on JIRA) in this article in Chrome, and the rest of your Jira usage can be configured in Safari with the Privacy features enabled. This is a one-step process that you will not have to repeat.
Getting Started
Step 1: Install FeatureOS on Jira
Go to your FeatureOS Dashboard → Organization Settings → Integrations and click on Connect in the JIRA section.
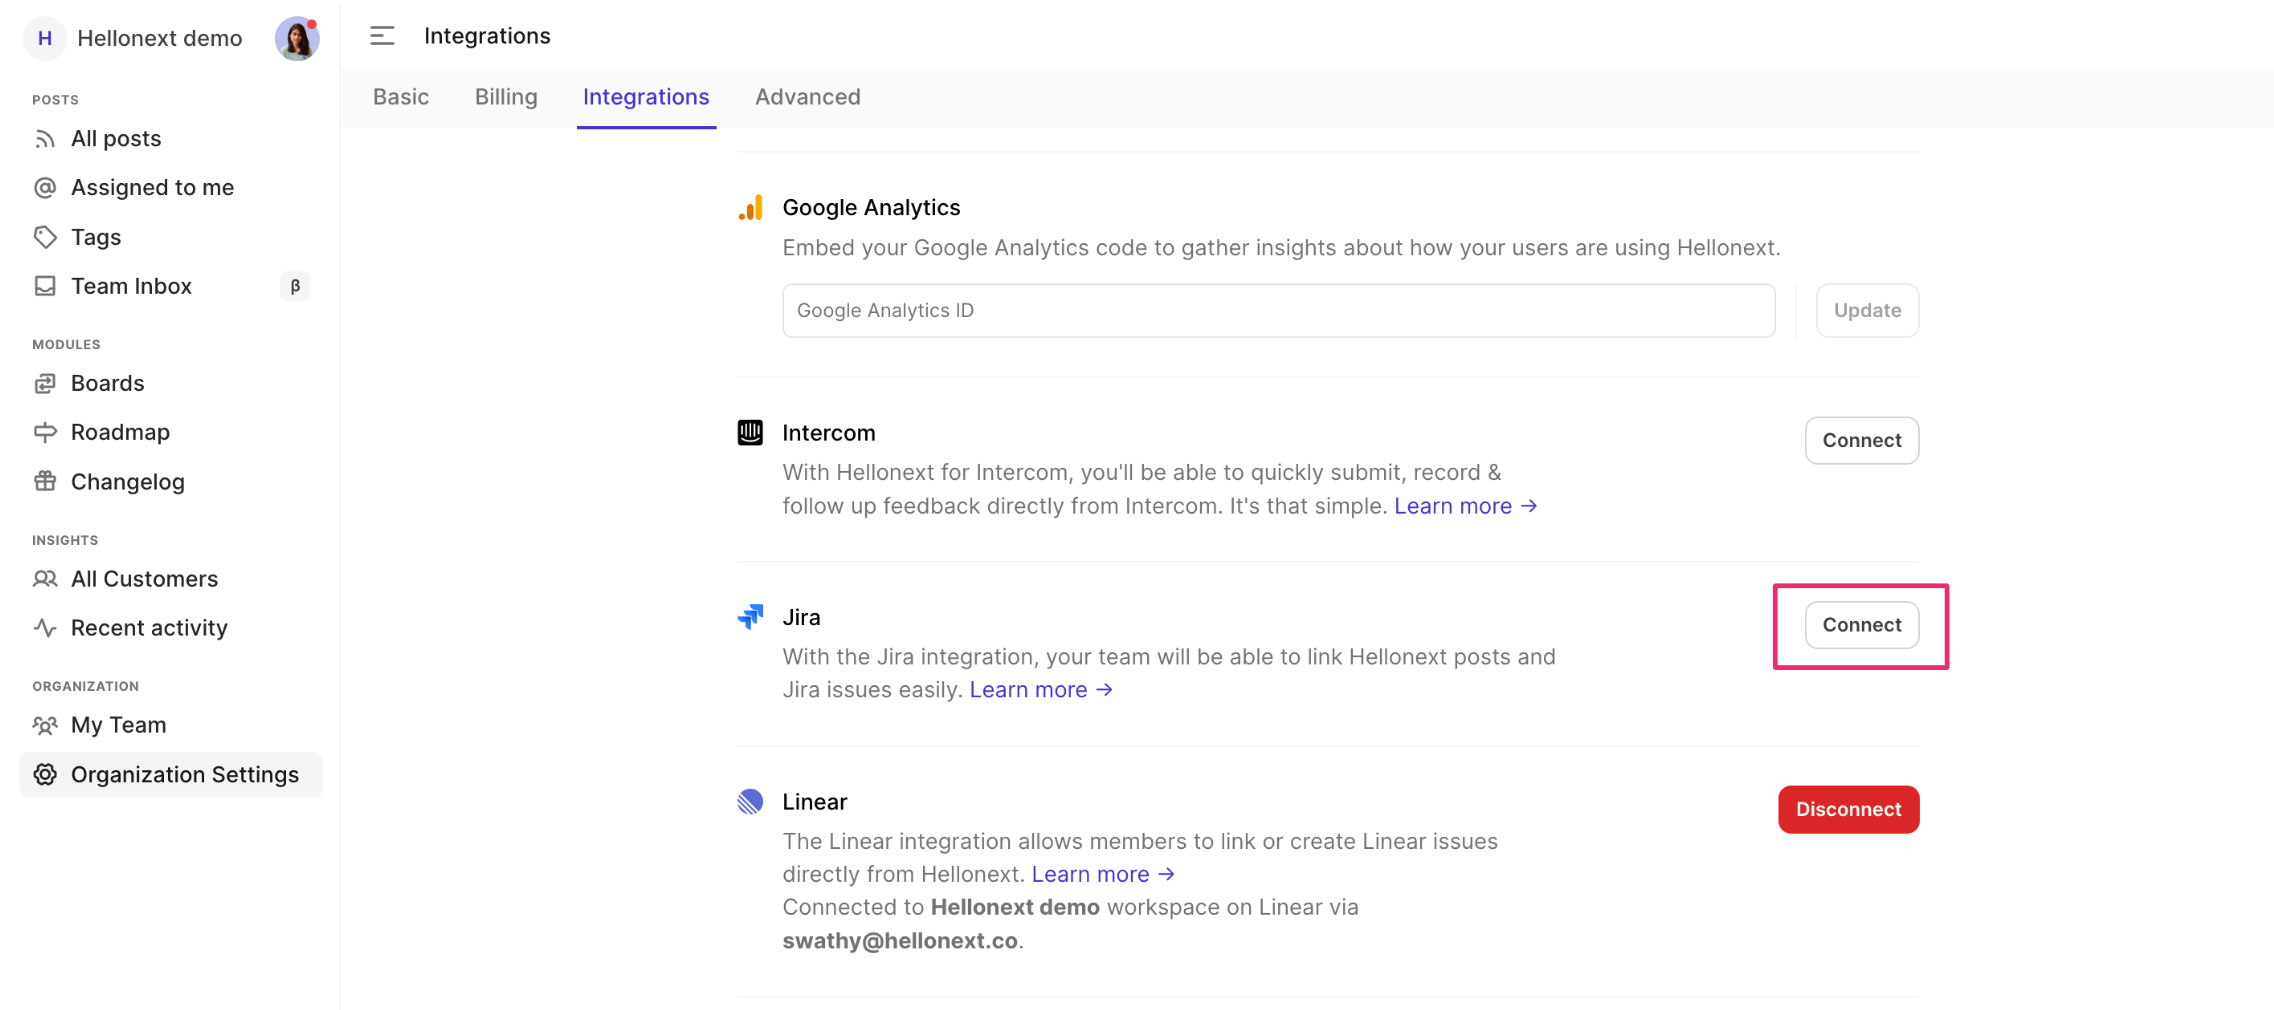
Make sure you are logged into your Jira home.
Visit https://marketplace.atlassian.com/apps/1227649/hellonext-for-jira and click on Get it now.
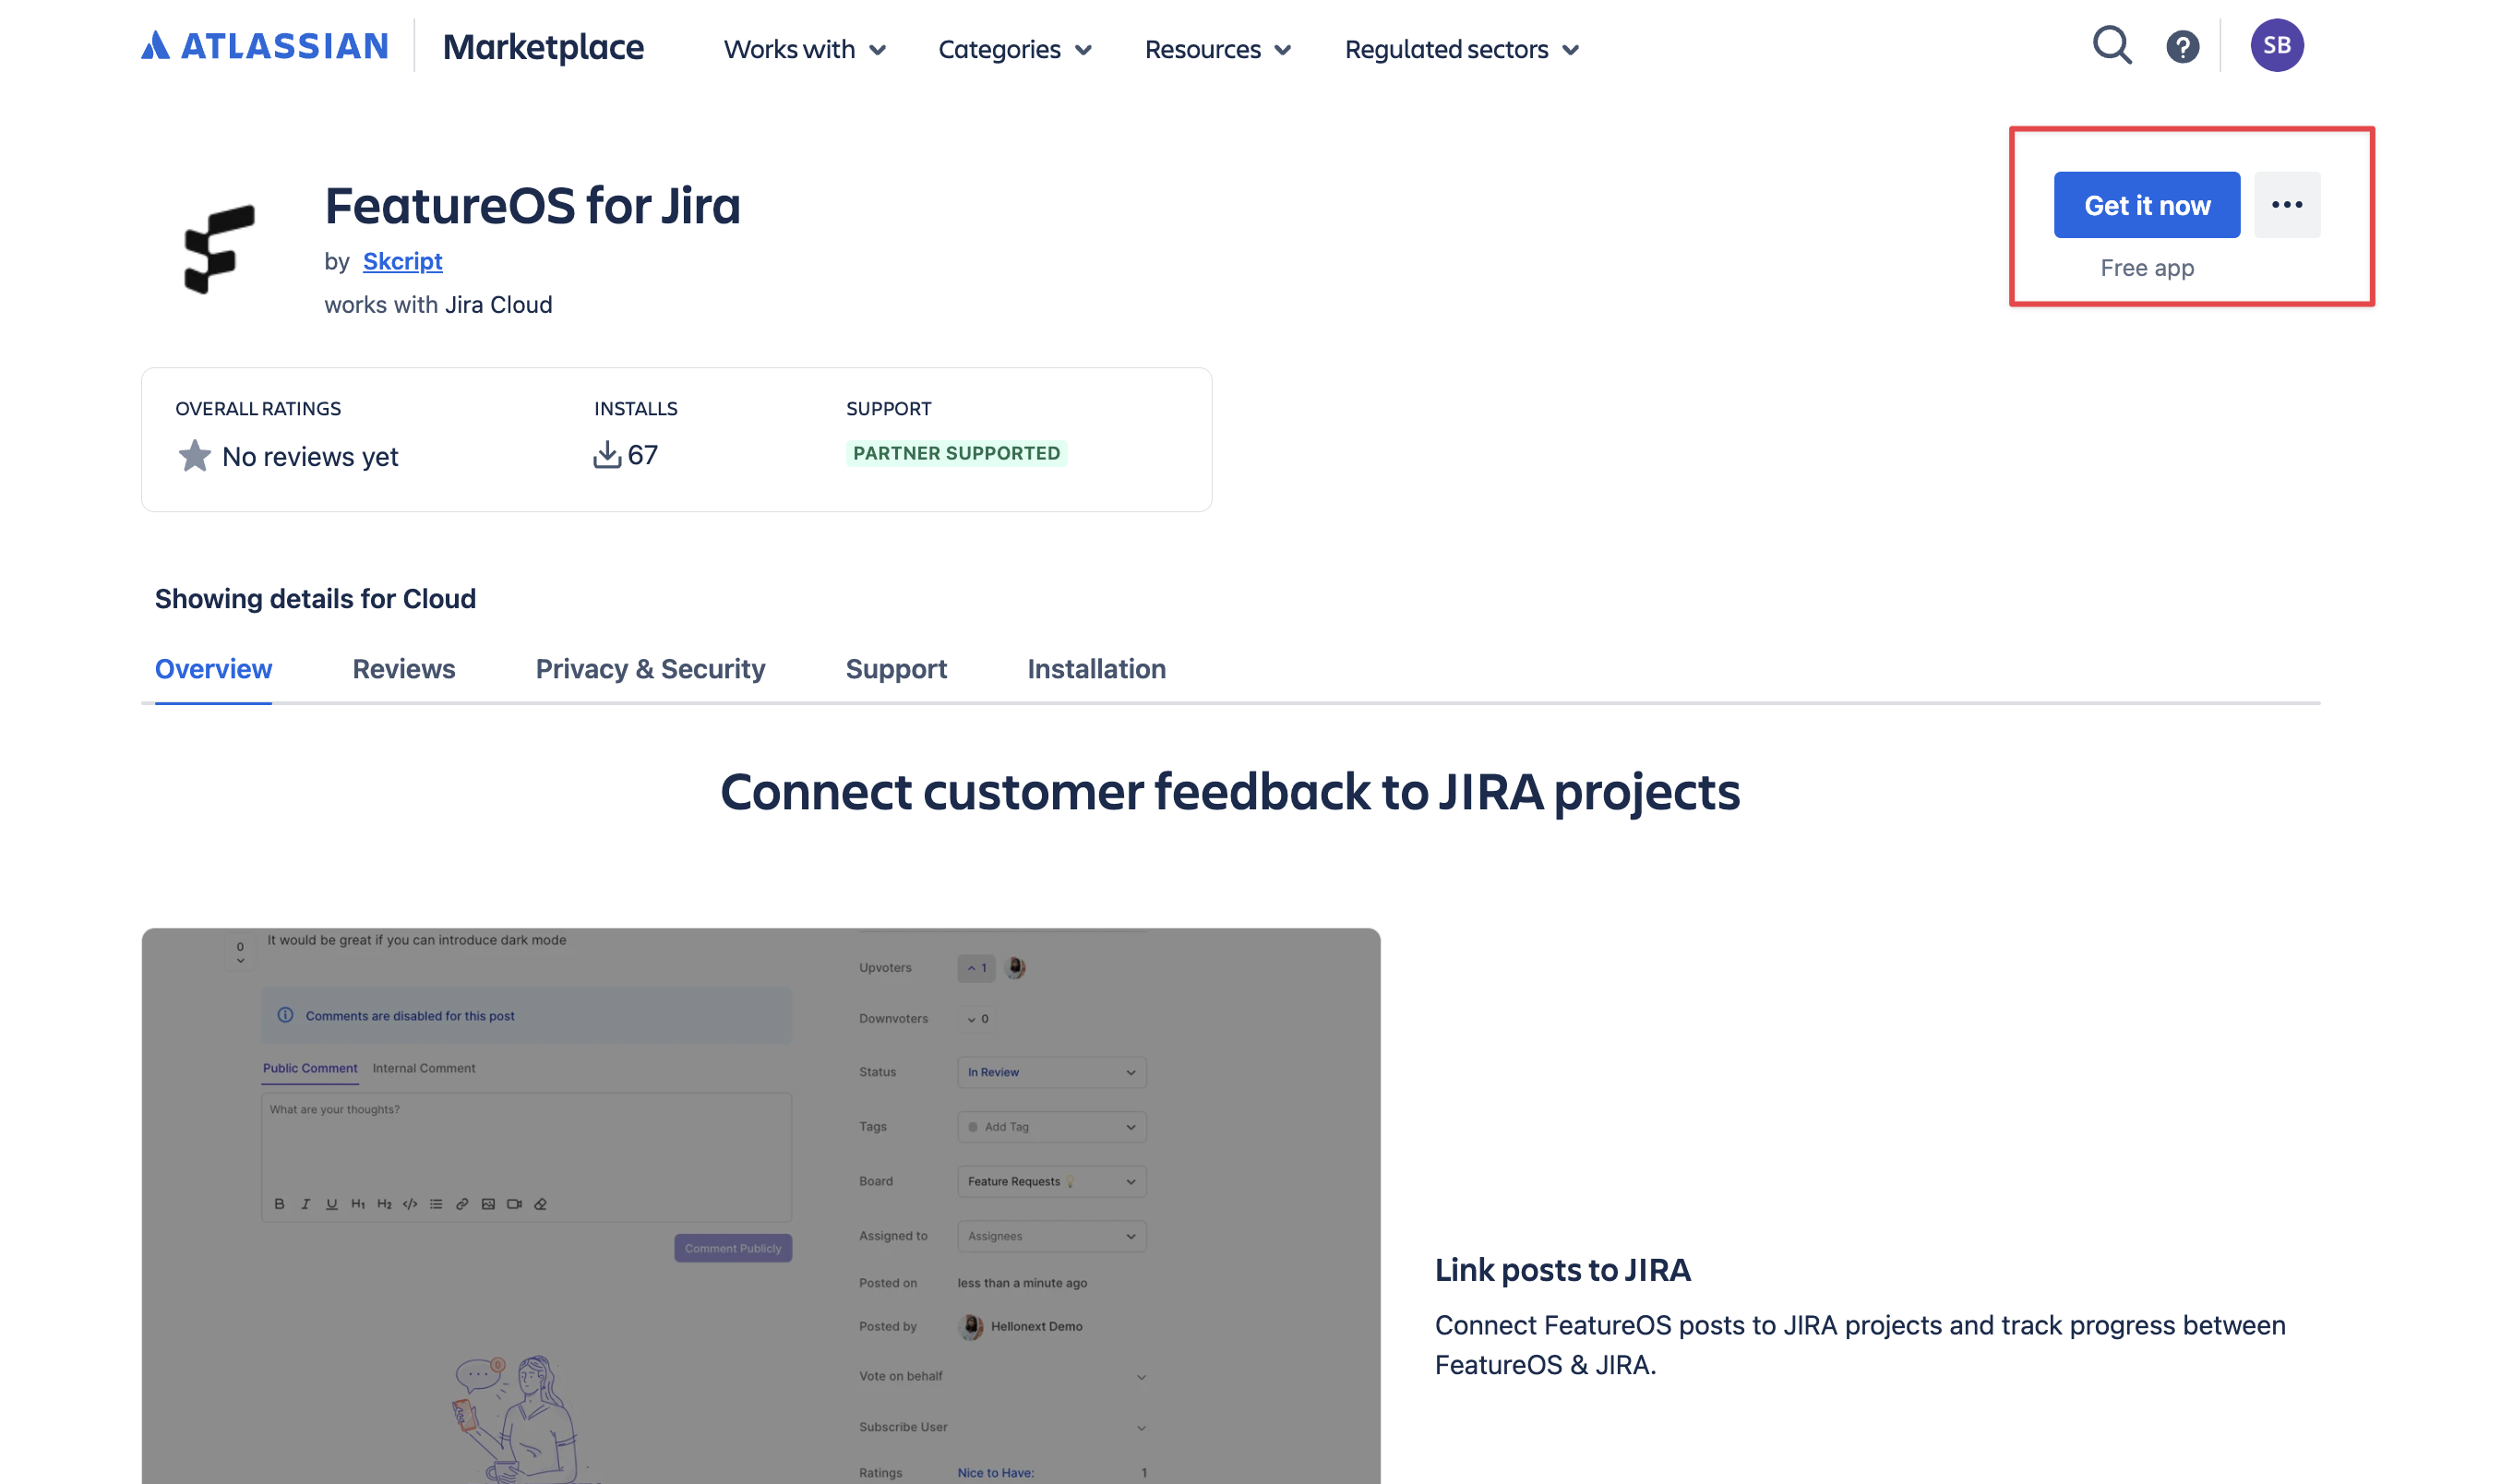
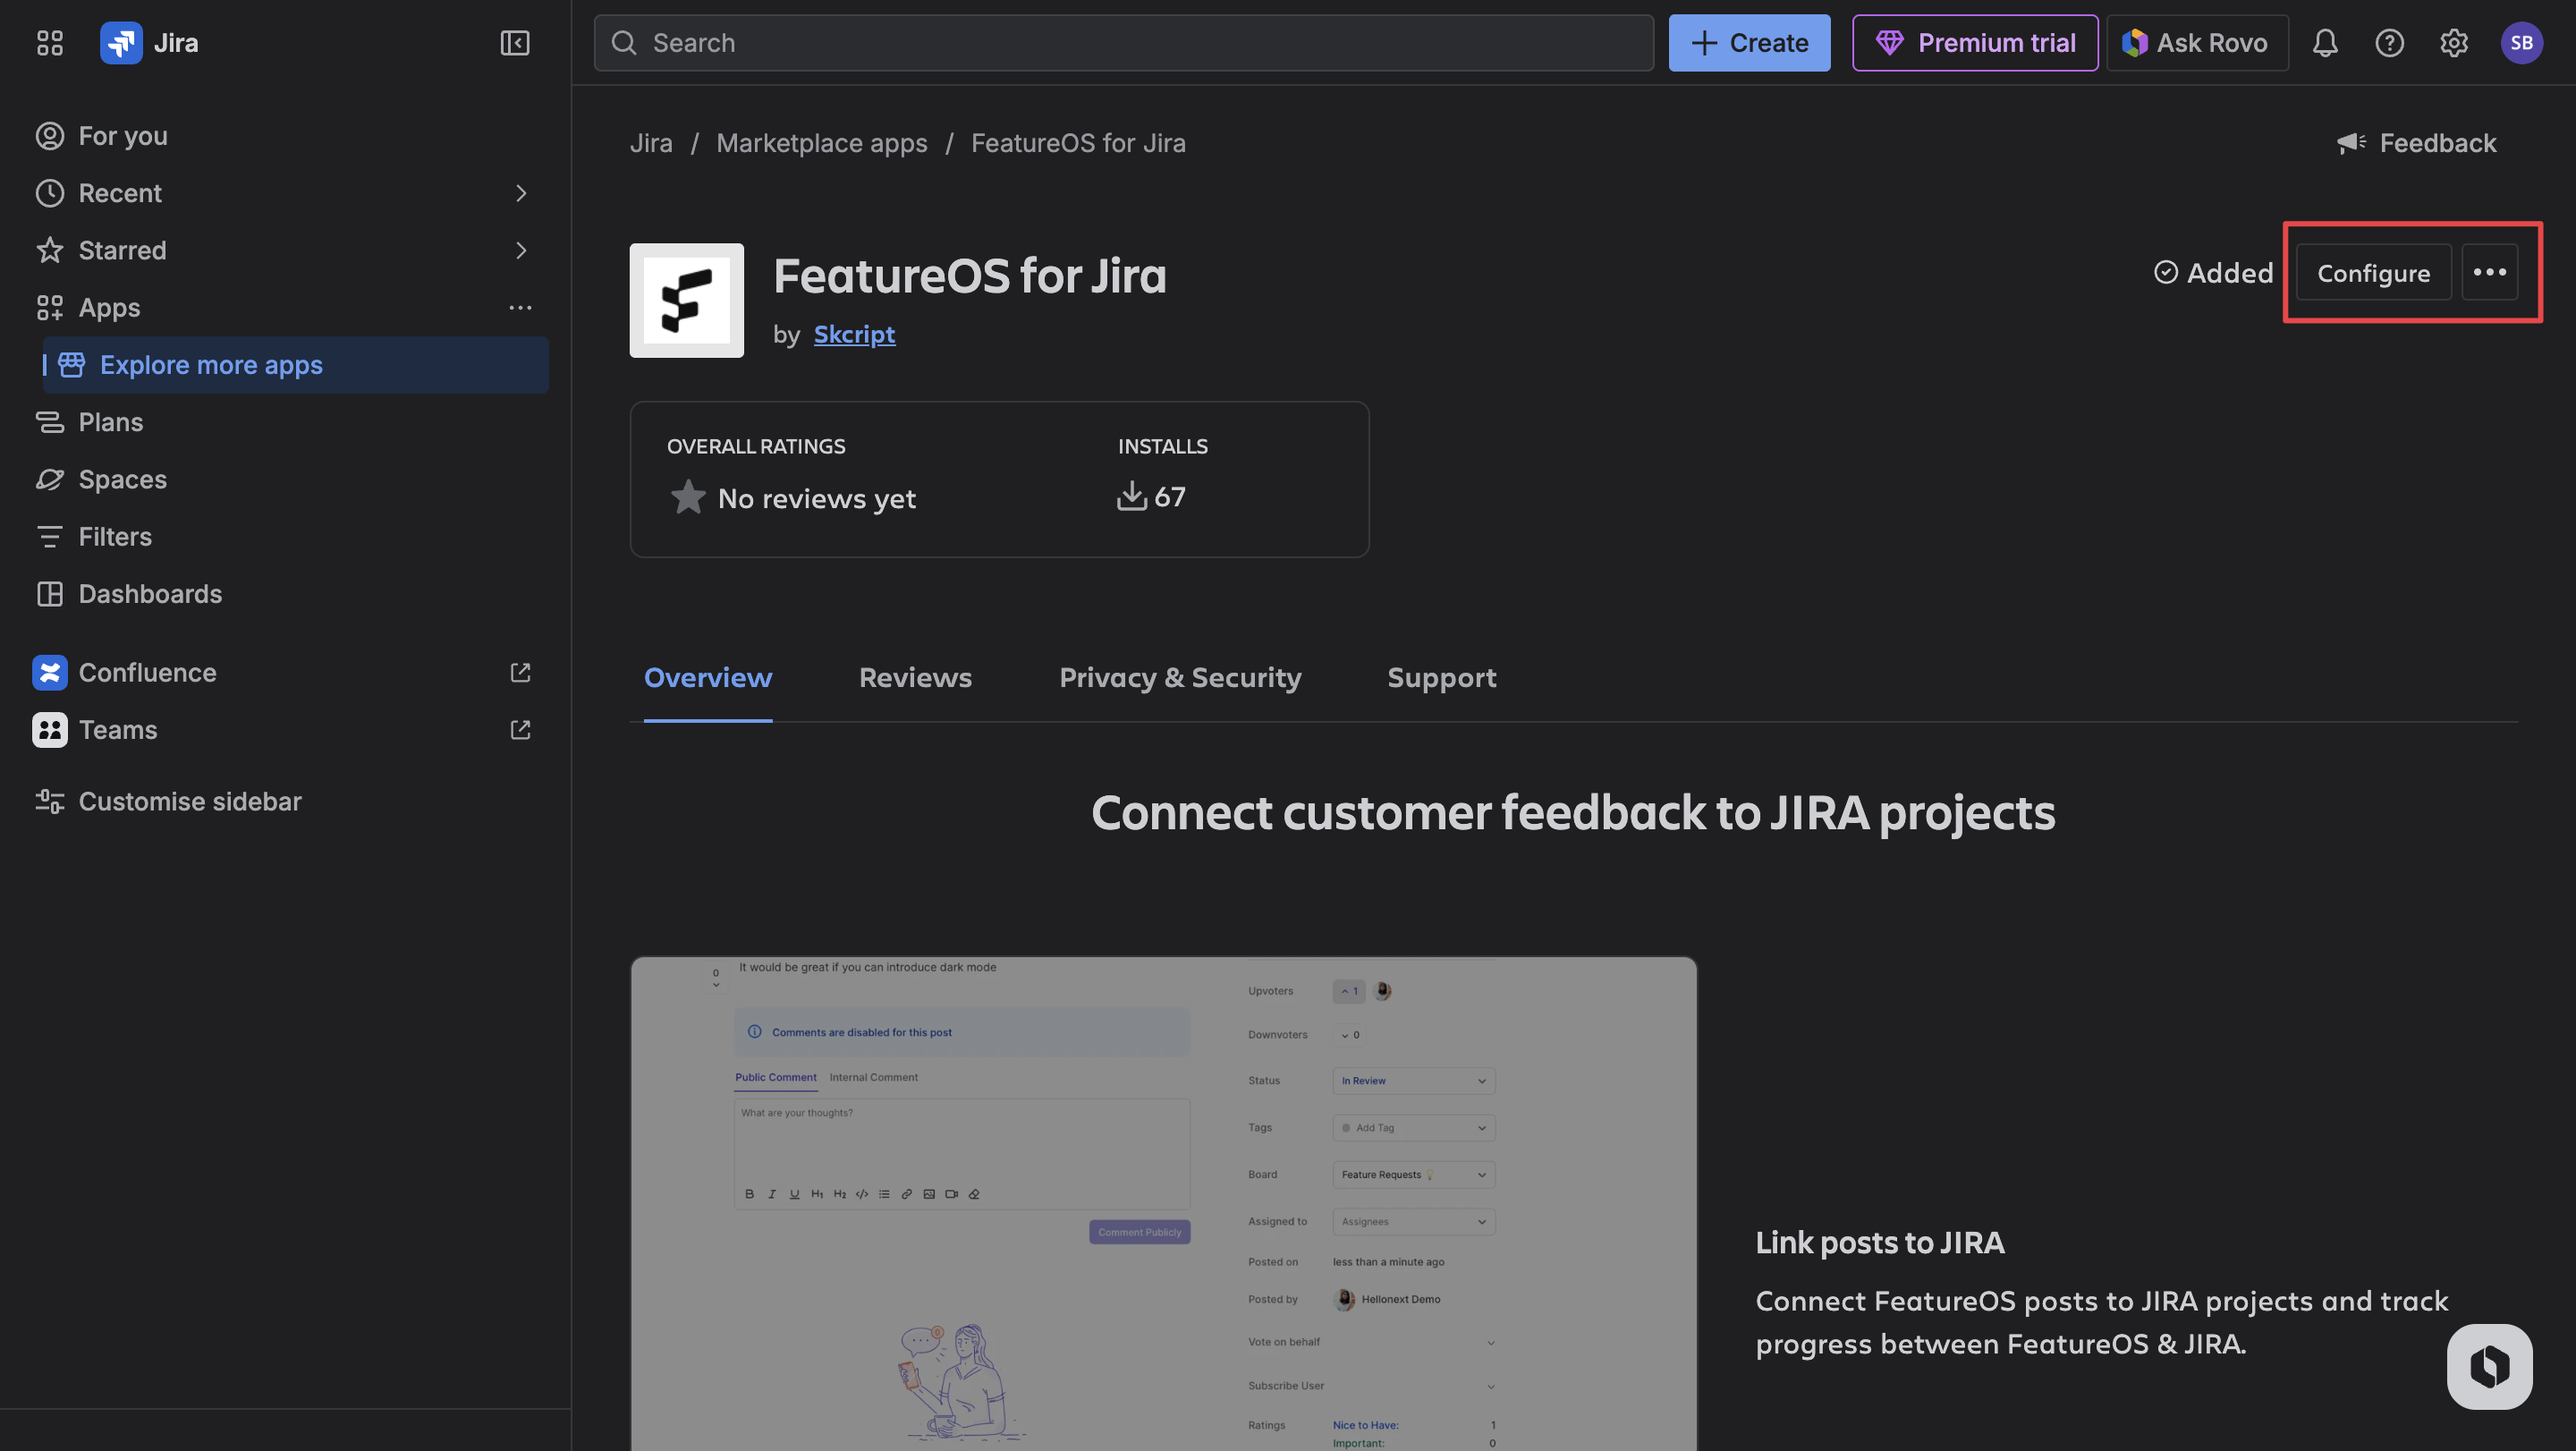
Once the installation is successful, click on Configure.
Enter the API key of your FeatureOS organization, and click on Update.
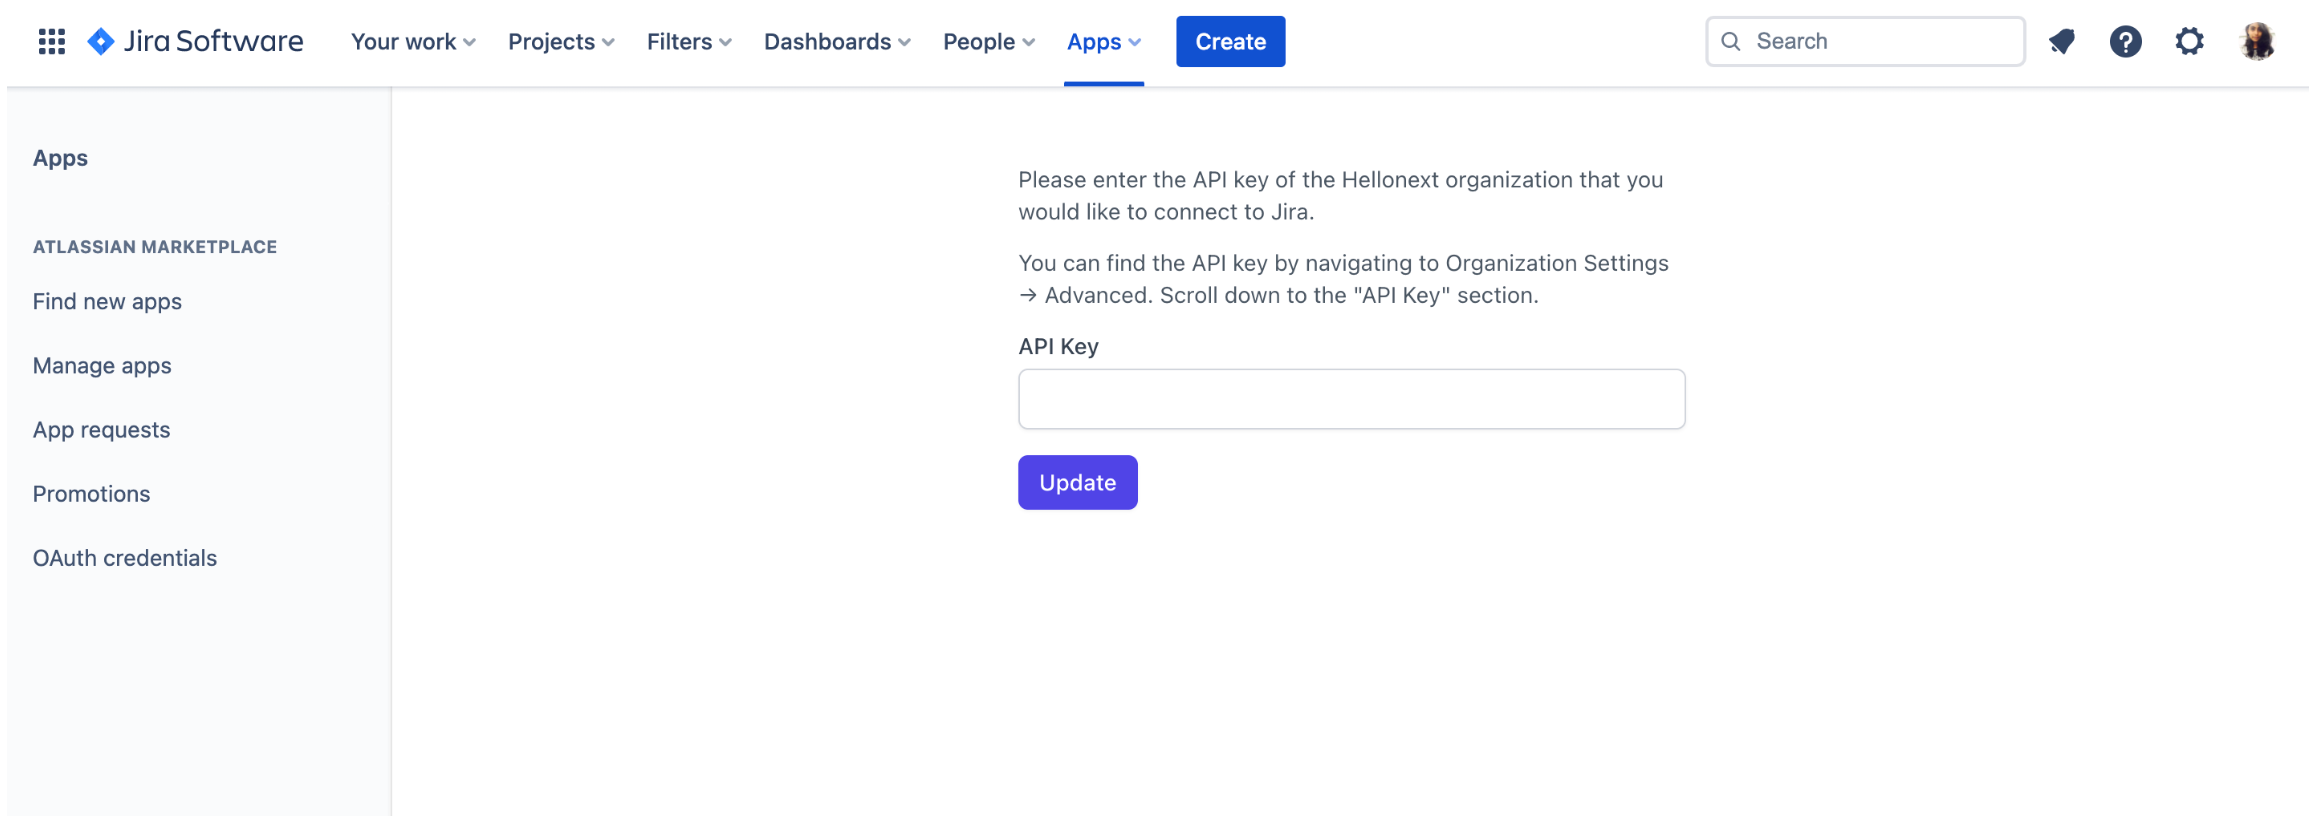
Once validated, the app is ready to be configured!
Head back to the Integrations page on your FeatureOS Dashboard to proceed.
Step 2: Updating configuration on FeatureOS
Go to Dashboard → Organization Settings → Integrations and click Configure on the Jira card. Everything below lives on this one configuration screen. Click Save at the bottom when you are done.
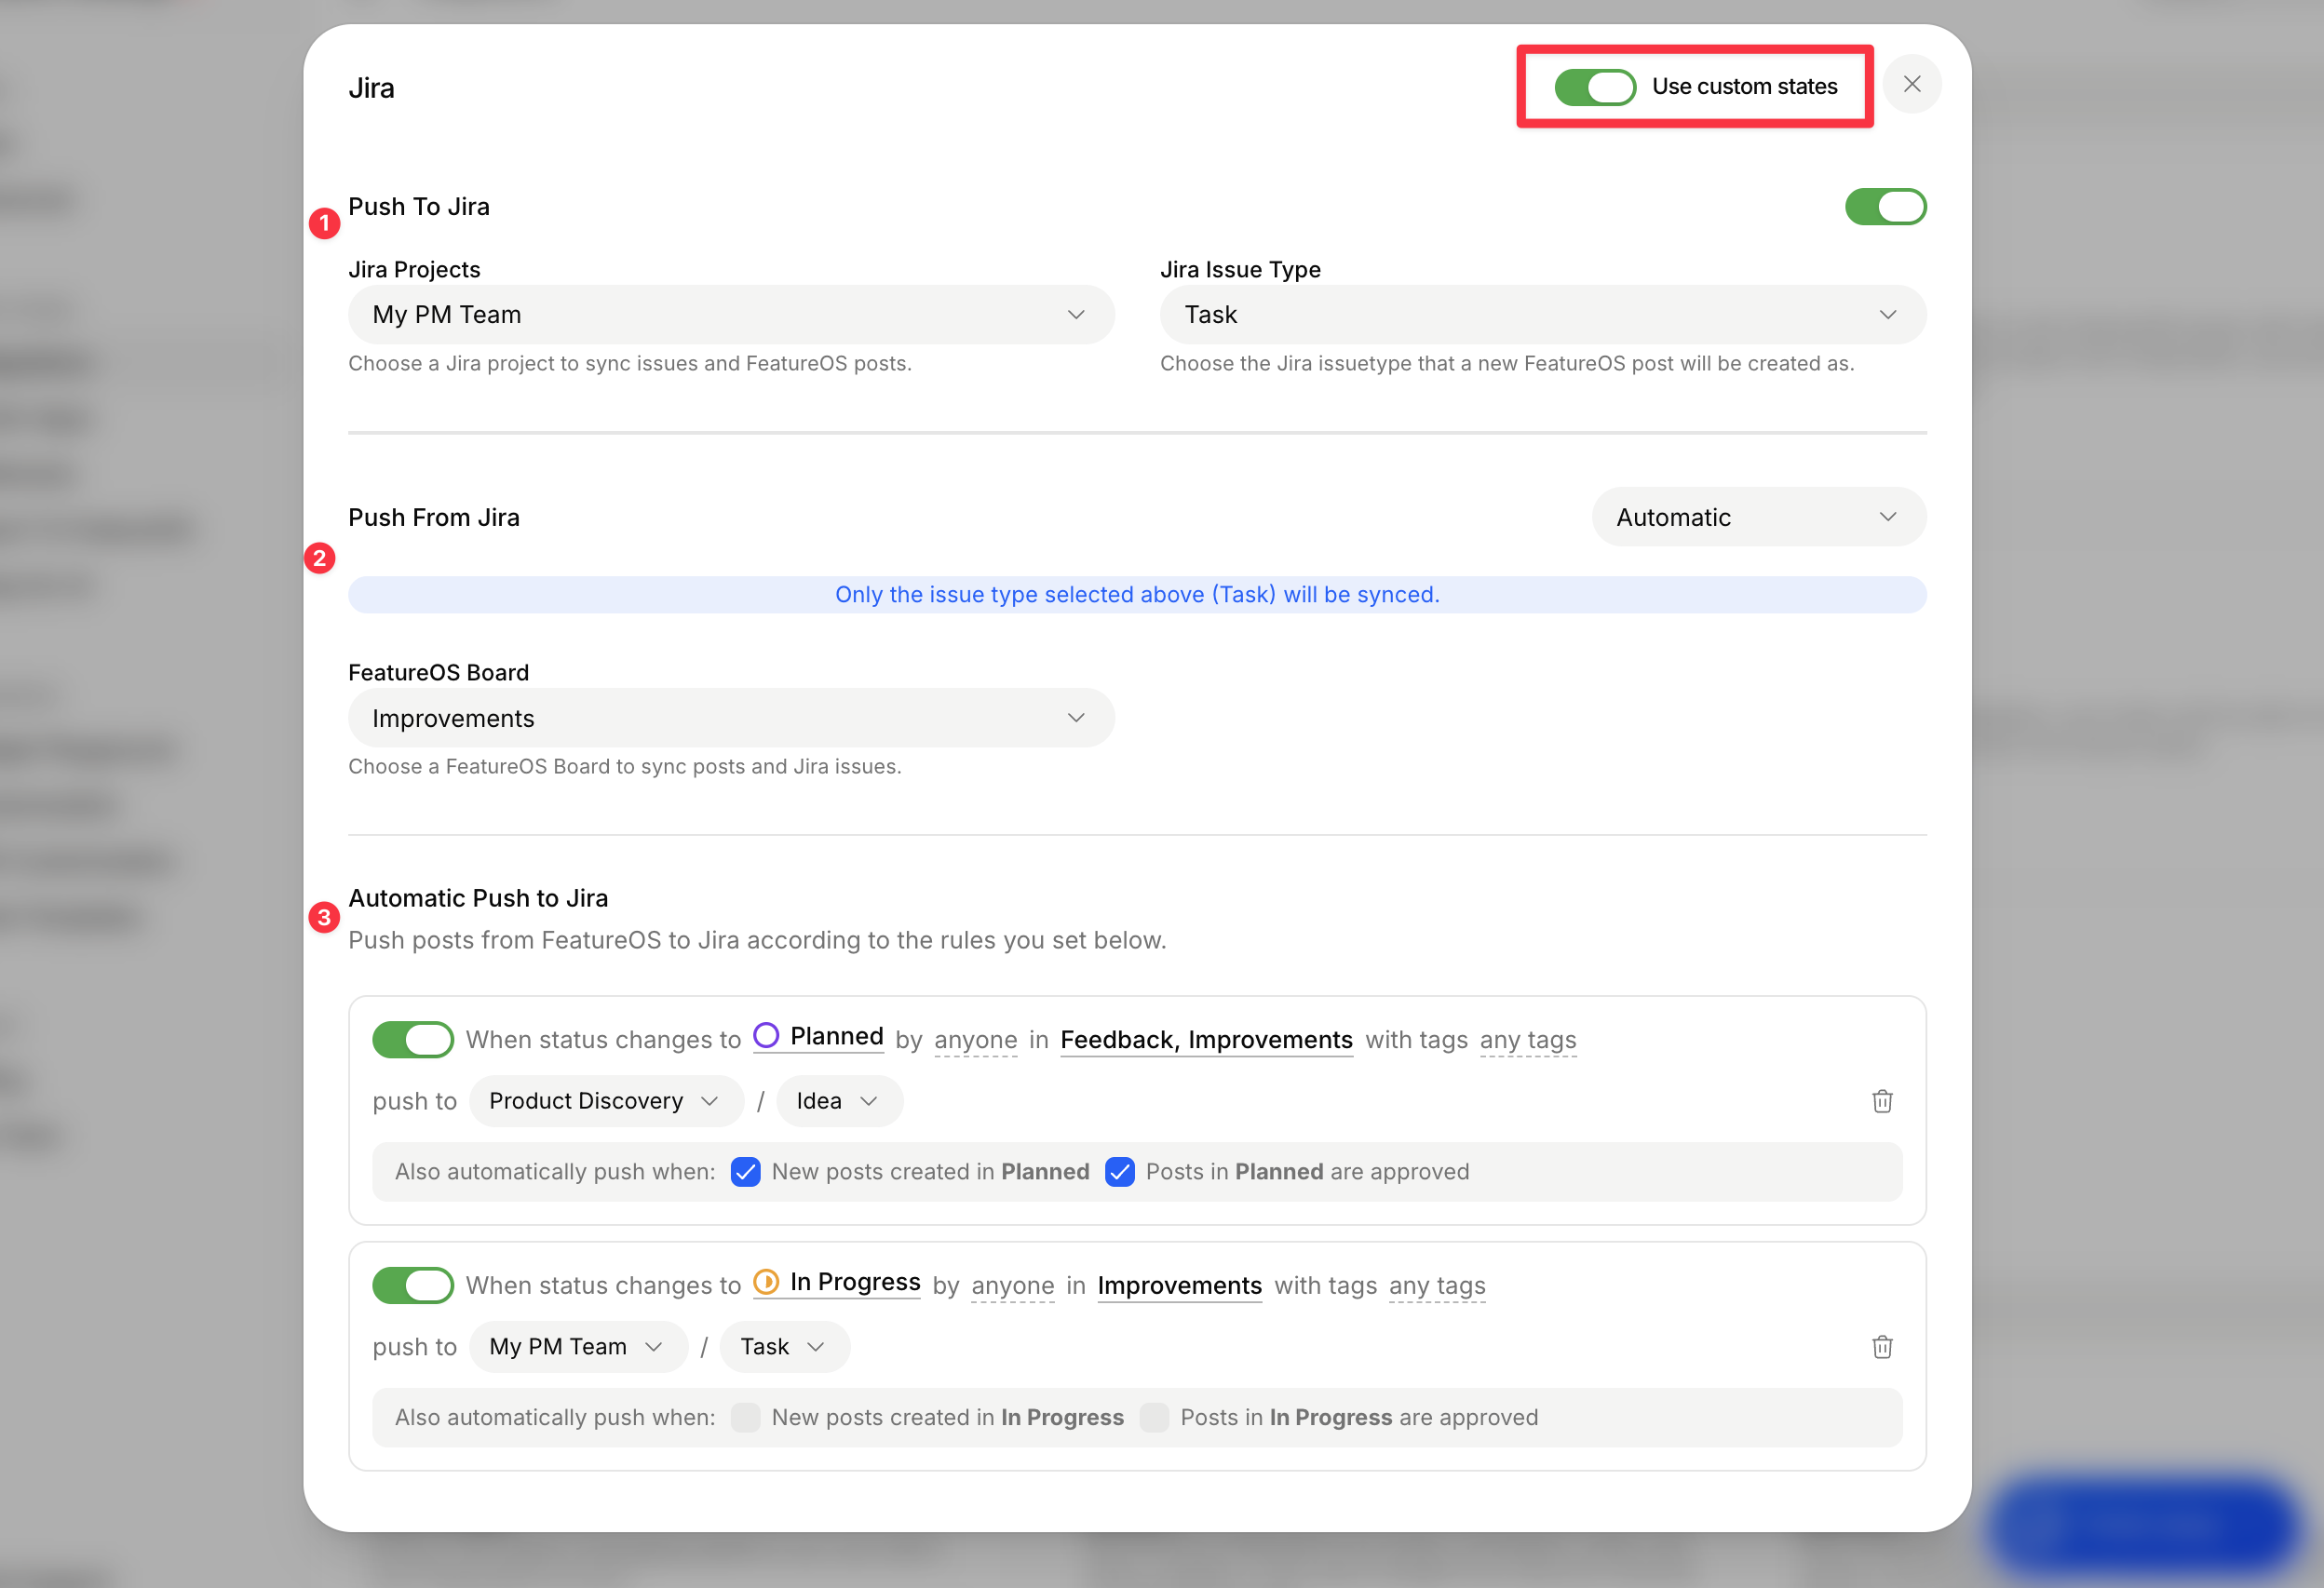
Use custom states
Toggle Use custom states at the top of the configuration screen to work with your own Jira workflow states instead of the default ones.
1. Push To Jira
Turn this on to create Jira issues from FeatureOS posts, or to link an existing Jira issue to a post using its issue key.
Jira Projects: the Jira project that issues sync with.
Jira Issue Type: the issue type a new FeatureOS post is created as.
2. Push From Jira
This creates FeatureOS posts from your Jira issues. Pick the mode in the dropdown, then pick the FeatureOS Board those posts land on.
Automatic: issues are exported to FeatureOS as soon as they are created in Jira. Posts created this way have the organization creator as the submitter by default.
Manual: an admin pushes issues one at a time from the Glance panel in Jira.
3. Automatic Push to Jira
Instead of pushing posts one by one, you can set rules that push posts to Jira for you. Click Add Rule to create one, and use the toggle on each rule to turn it on or off without deleting it.
Each rule reads as a sentence:
When status changes to [status] by [anyone] in [board] with tags [any tags], push to [Jira project] / [issue type].
Status: the FeatureOS status that triggers the push, such as Planned or In Progress.
By: limit the rule to changes made by specific team members, or leave it as anyone.
In: the FeatureOS board the rule watches.
With tags: limit the rule to posts carrying specific tags, or leave it as any tags.
Push to: the destination Jira project and issue type. Different rules can point at different projects, so feedback can go to one team and improvements to another.
Each rule also has two extra triggers:
New posts created in
[status]: pushes a post the moment it is created in that status, not only when it changes into it.Posts in
[status]are approved: pushes a post when it is approved while sitting in that status.
Use the delete icon on the right of a rule to remove it.
Example: When status changes to Planned by anyone in Feedback with any tags, push to Product Discovery / Idea.
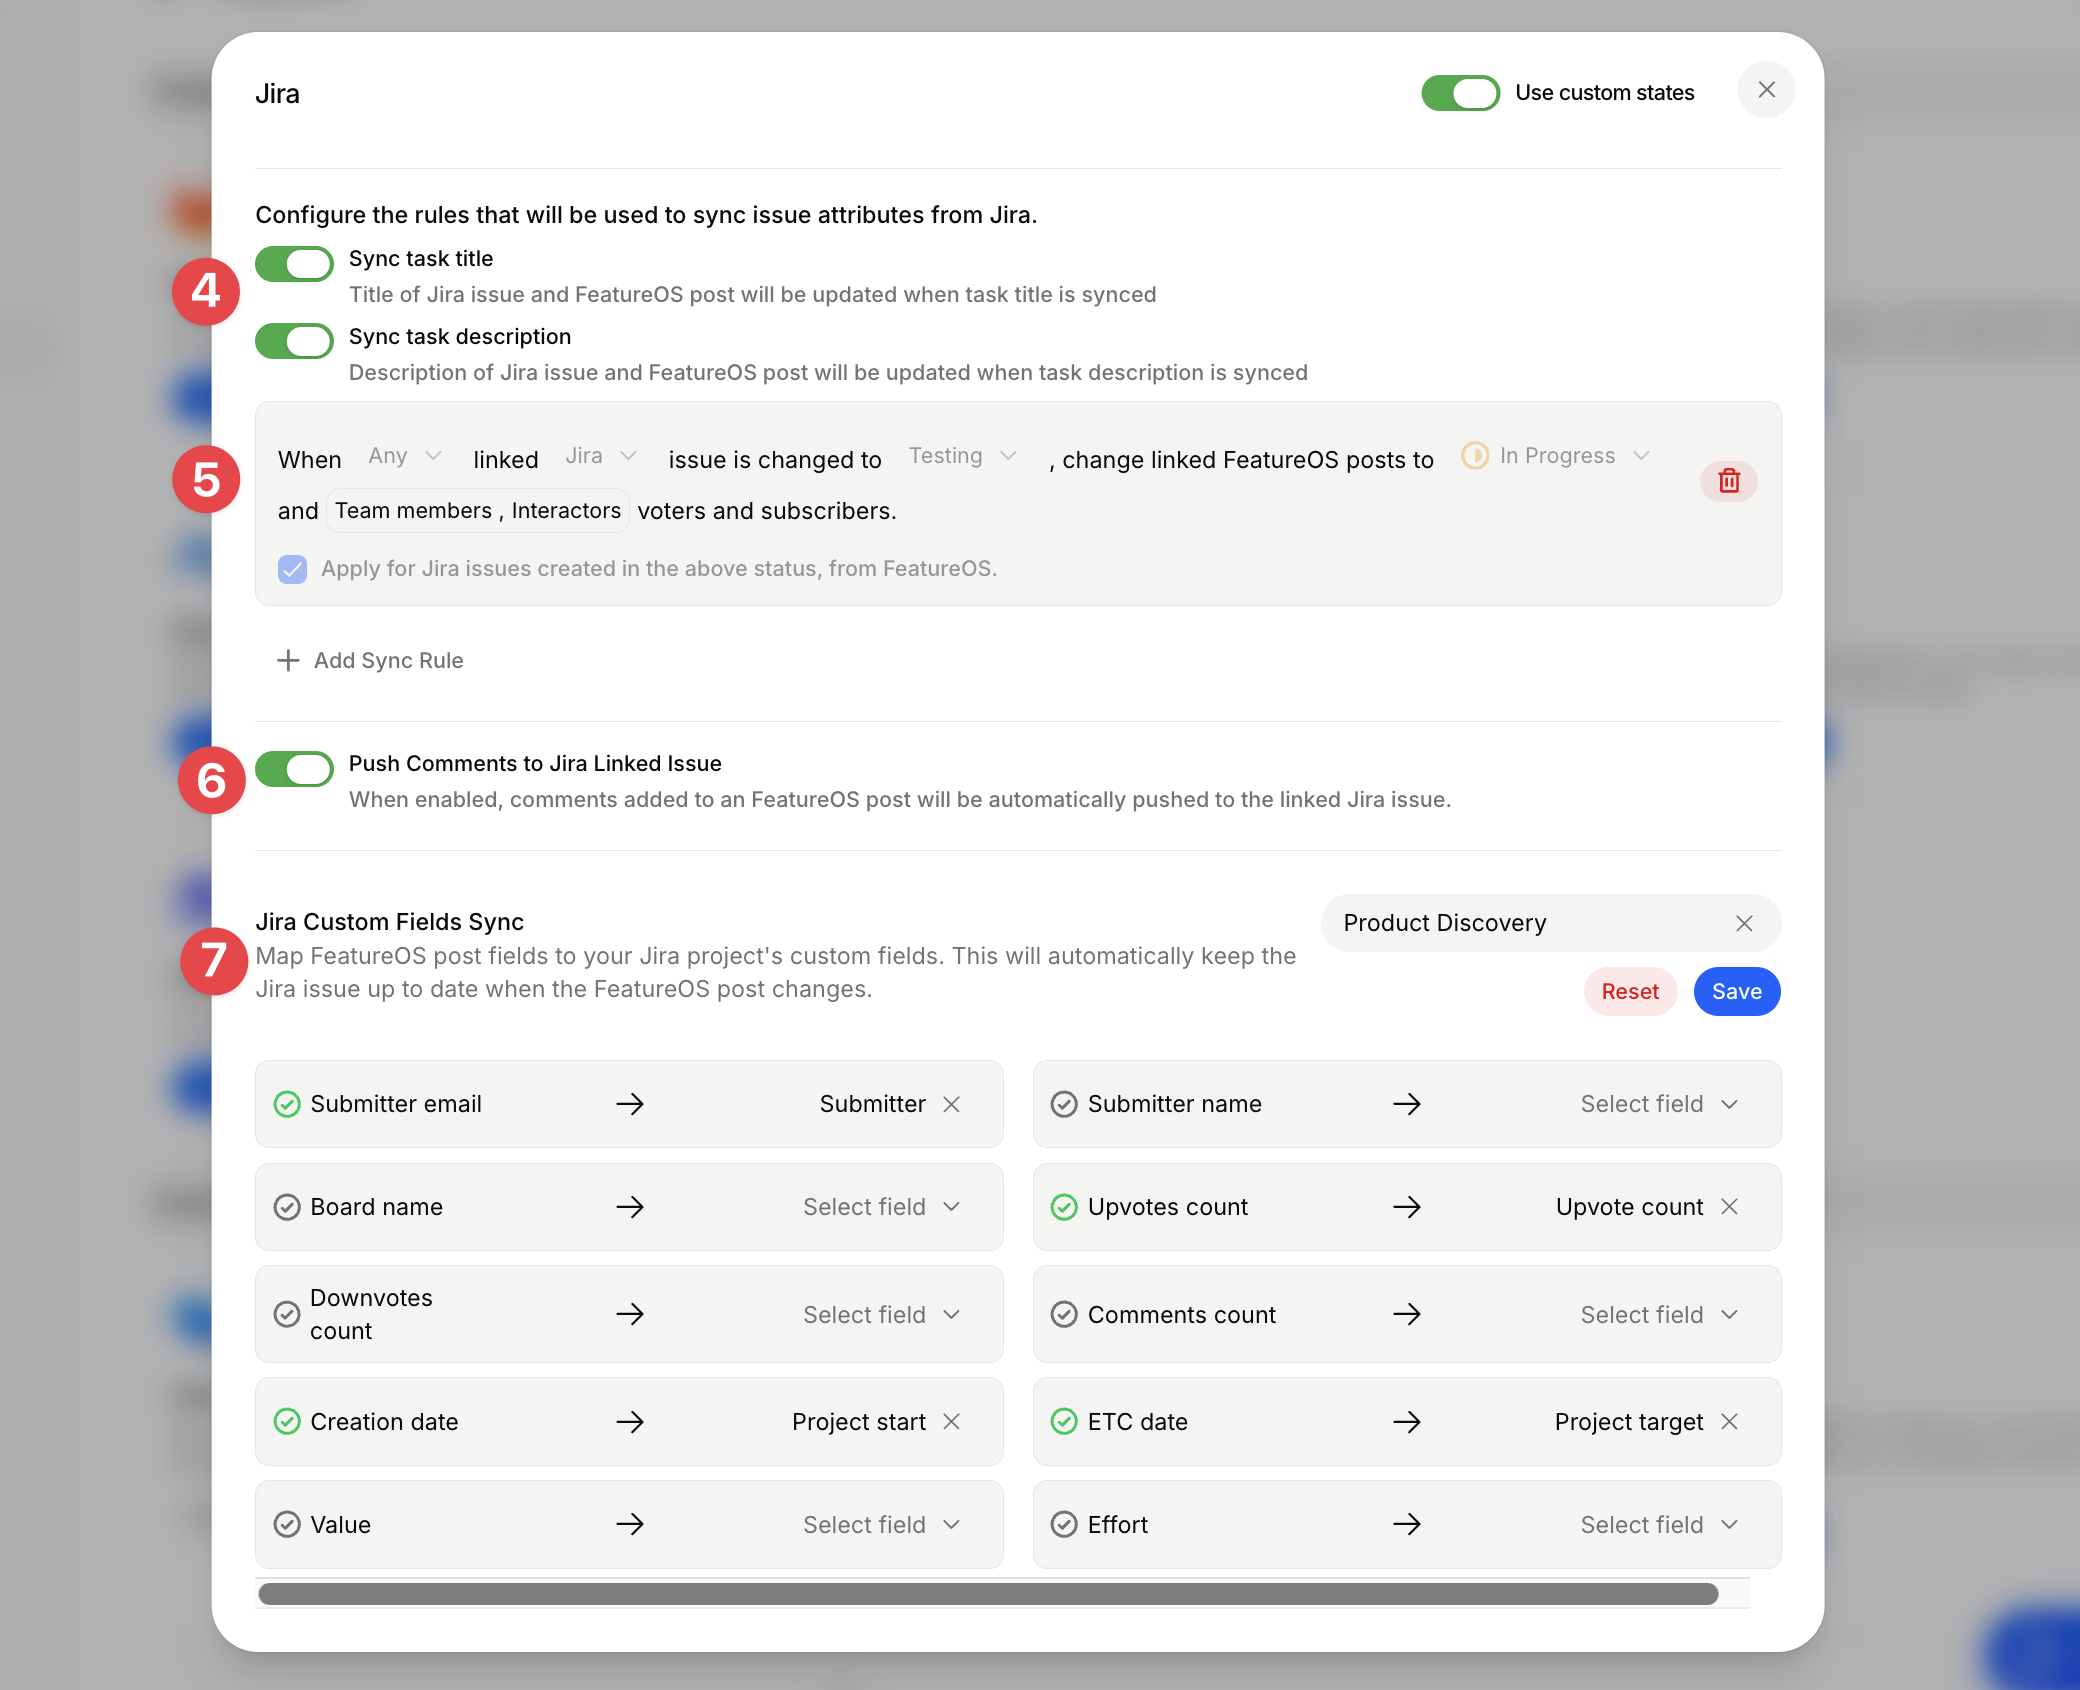
4. Syncing issue attributes from Jira
These toggles control what Jira sends back to the linked FeatureOS post.
Sync task title: the title of the Jira issue and the FeatureOS post stay in step.
Sync task description: the description of the Jira issue and the FeatureOS post stay in step.
Both are off by default. You no longer need to contact support to turn description sync off.
5. Setting Rules for Sync
FeatureOS also offers status mapping with JIRA Rules for Sync. You can configure the JIRA status to one of the available FeatureOS statuses.
To update FeatureOS posts to ‘In Progress ’ when any linked JIRA issue is updated to ‘In Progress’, you can use the rule to emulate the same for you. You can also choose to notify the users of the same in the rules section.
When multiple posts are configured to a single FeatureOS board, we also provide a rule where status updating occurs only when all the linked Jira issues are updated to a single configured status.
For Example: To update FeatureOS posts to Completed when all linked JIRA issues are updated to Done, you can use the rule to do it automatically.
6. Push Comments to Jira Linked Issue
Turn this on to automatically add comments to a FeatureOS post pushed to the linked Jira issue.
7. Jira Custom Fields Sync
Map FeatureOS post fields to the custom fields on your Jira project. Once mapped, the Jira issue updates automatically whenever the FeatureOS post changes.
Pick a project in the Select project dropdown.
Map each FeatureOS post field to the Jira custom field it belongs in.
Click Save. Reset clears the mapping for that project.
JIRA Glance Panel
After integrating FeatureOS with JIRA, you can access the glance panel by clicking on the open FeatureOS option on your JIRA issue page.
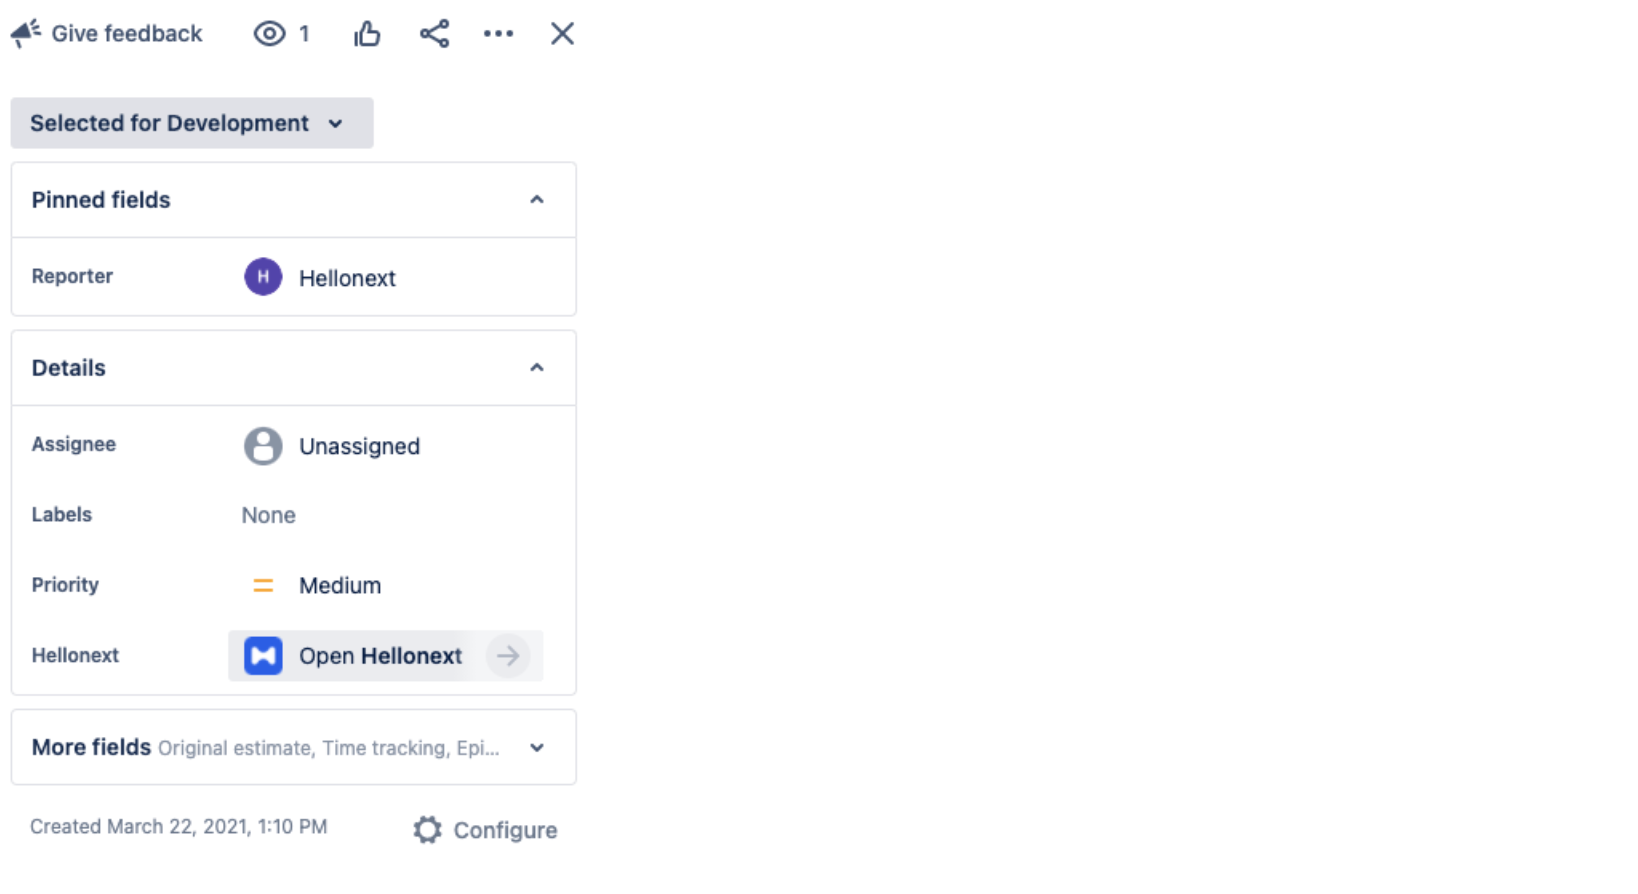
A JIRA issue can be exported by clicking on the ‘Export to FeatureOS’ button in the glance panel. On successful creation, you will be redirected to the posting page on FeatureOS.

If an issue is already present on FeatureOS, you can access it with the View on FeatureOS button in the glance panel on JIRA.
Workflow
Creating a Jira issue from FeatureOS
Push To Jira has to be enabled in the configuration screen.
Use the Create In Jira option on any individual post page. The new issue appears under Linked Jira Issues on that post.
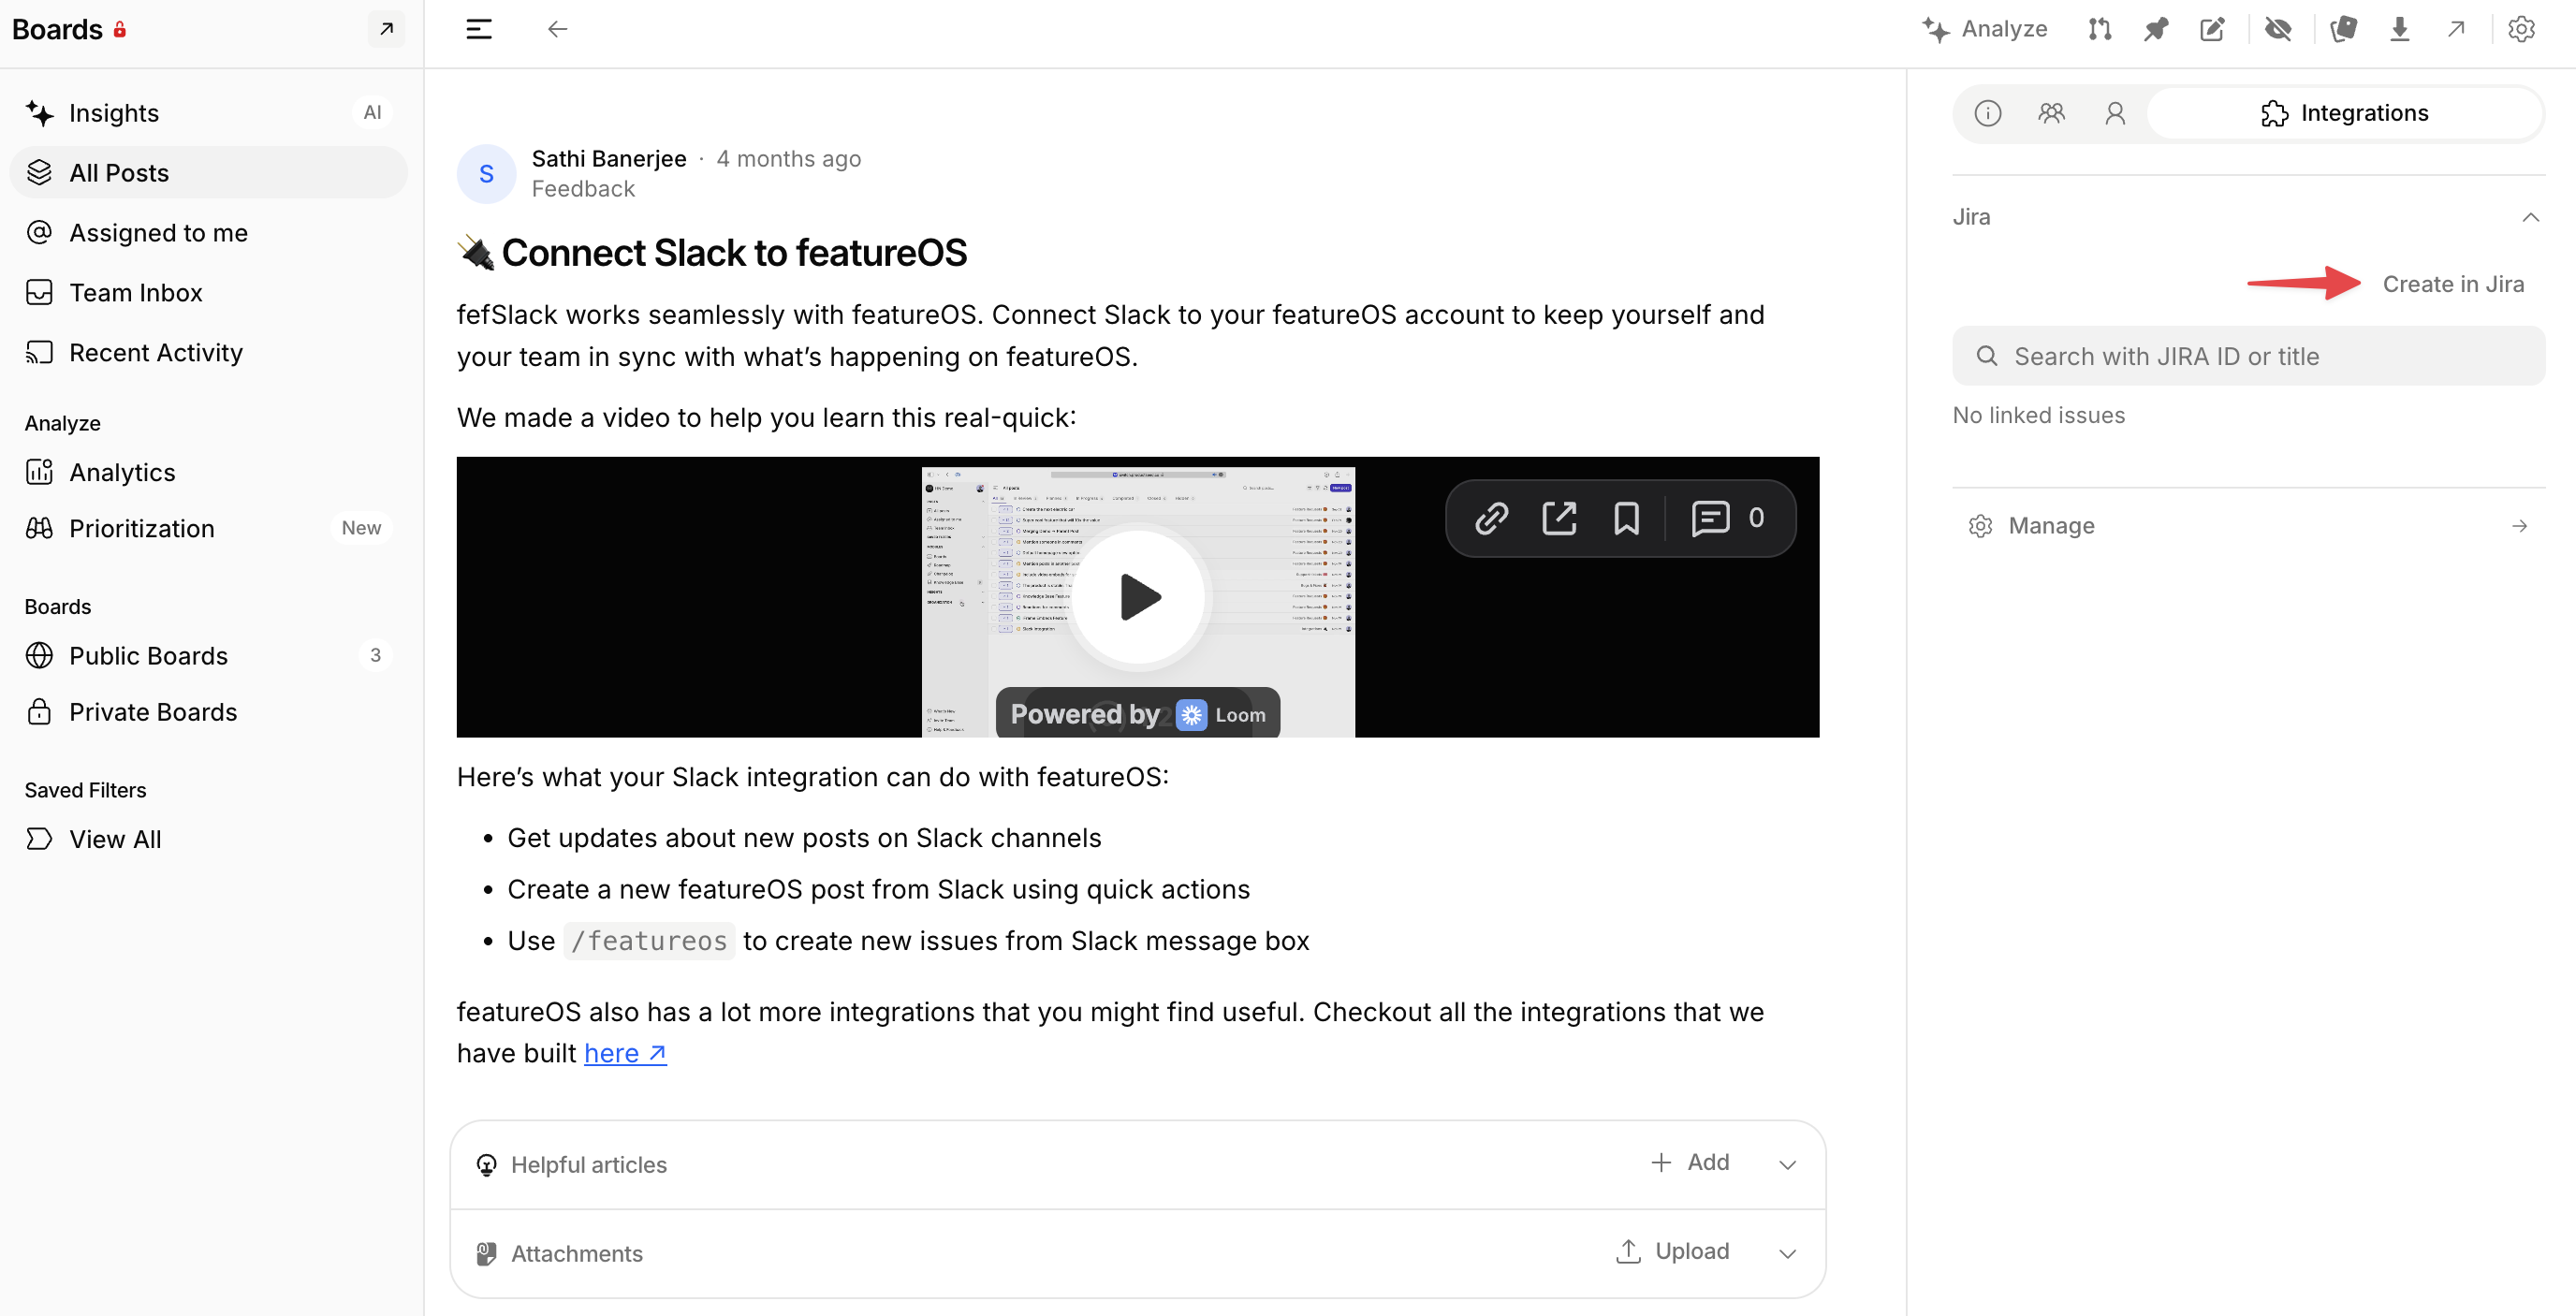
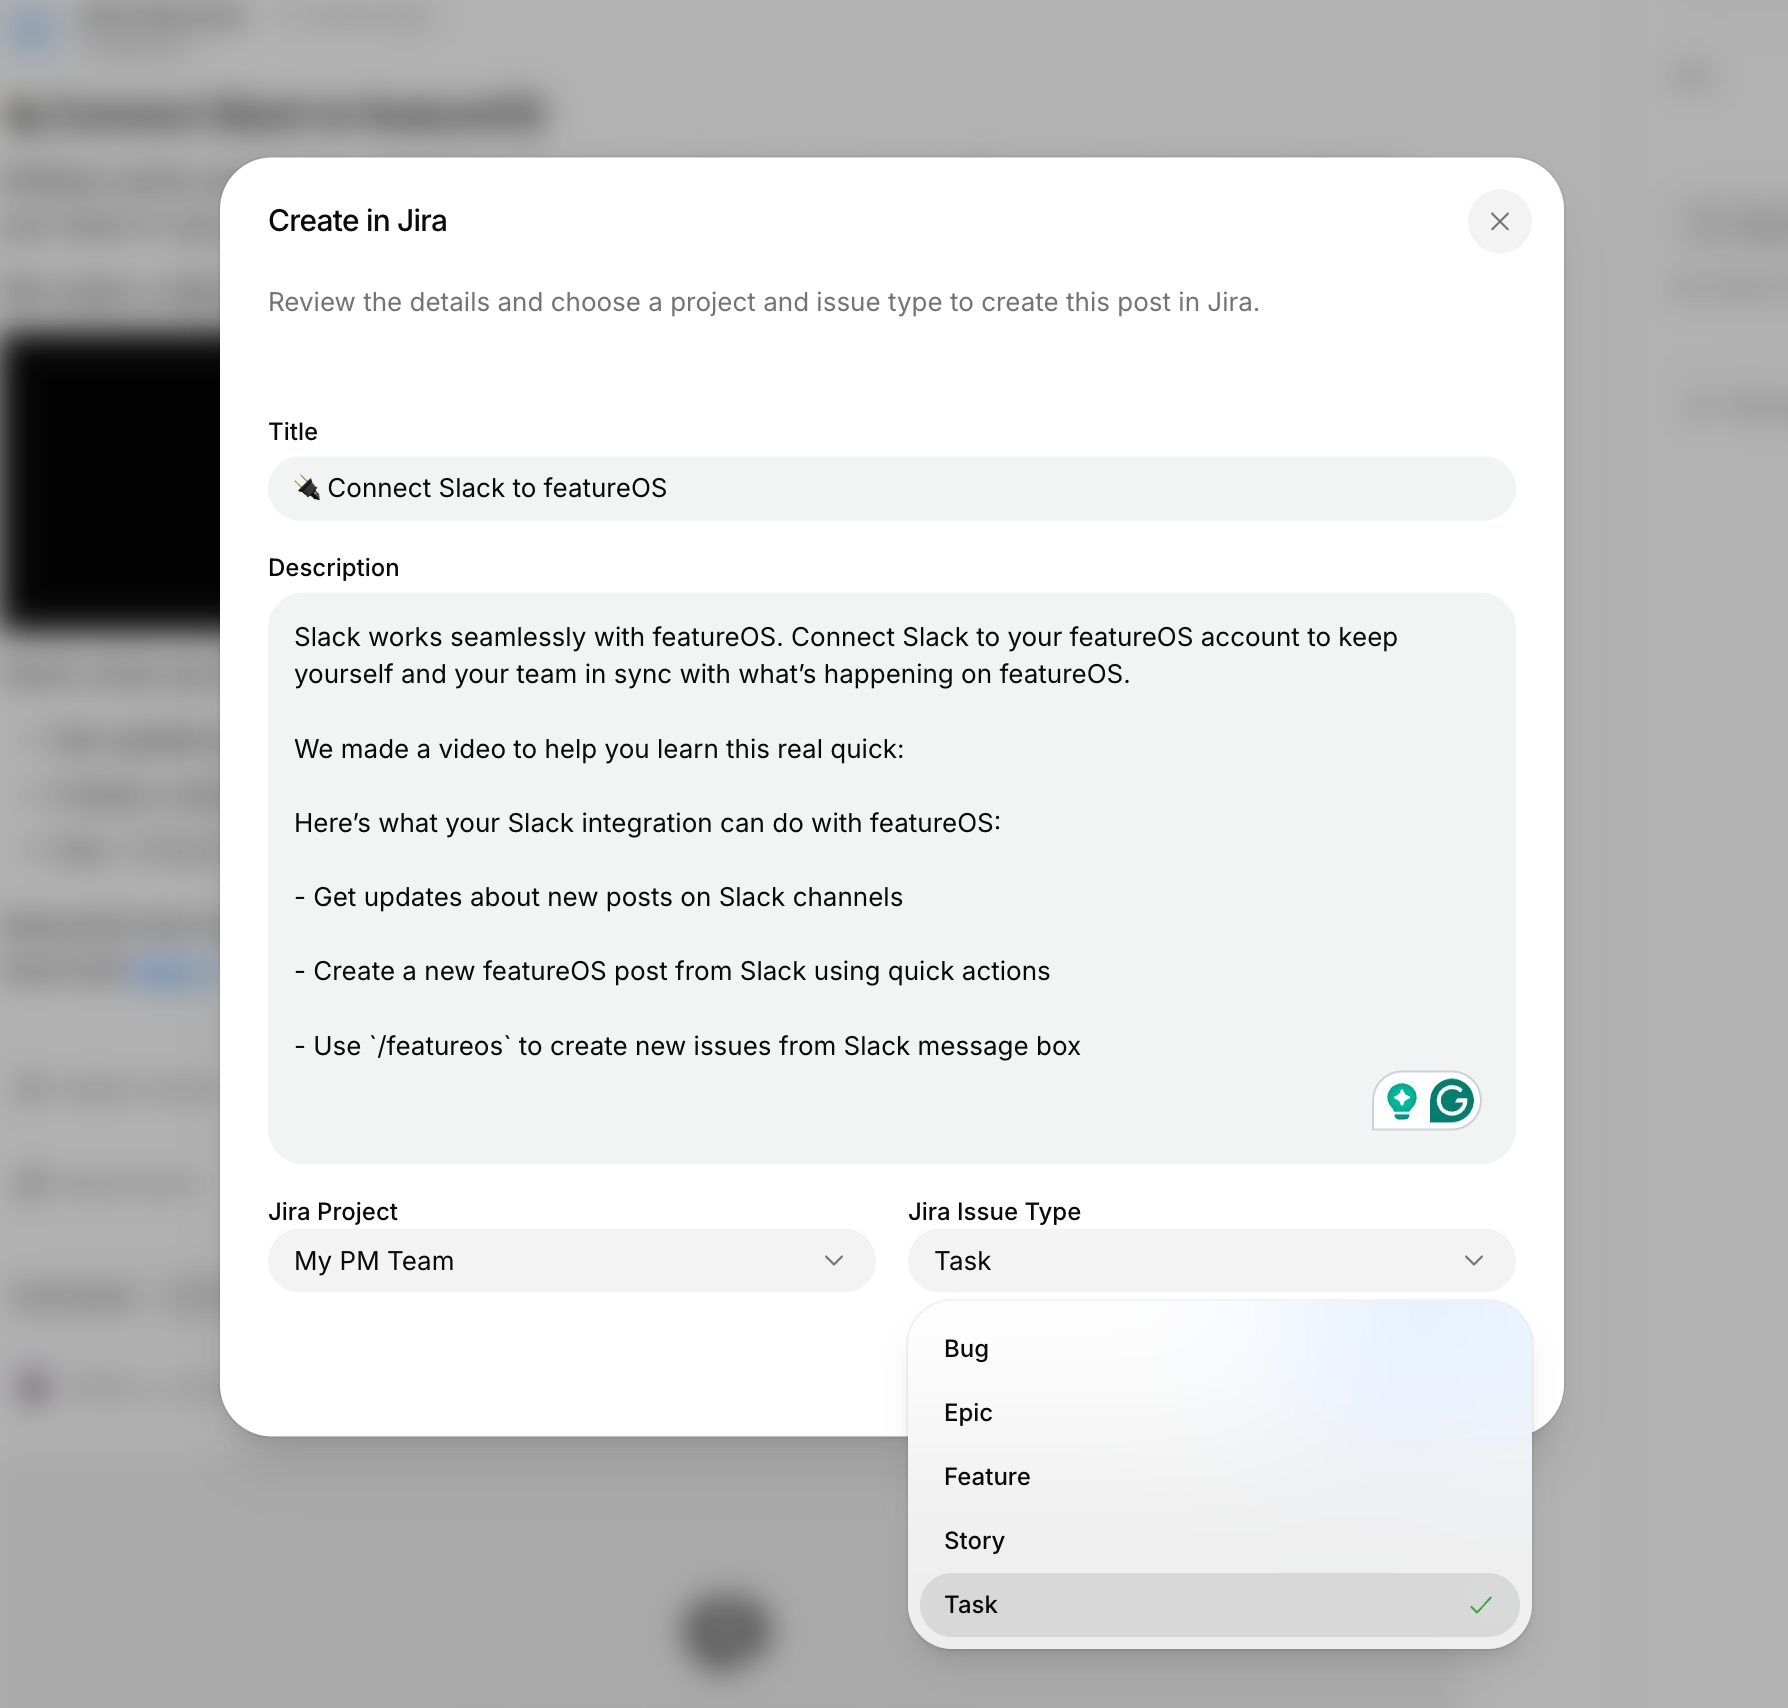
You can edit the title and description as needed and choose the Project + Issue Type before creating.
The subsequently created issue will be directly added under the Linked Jira Issues section.
Linking an existing Jira issue
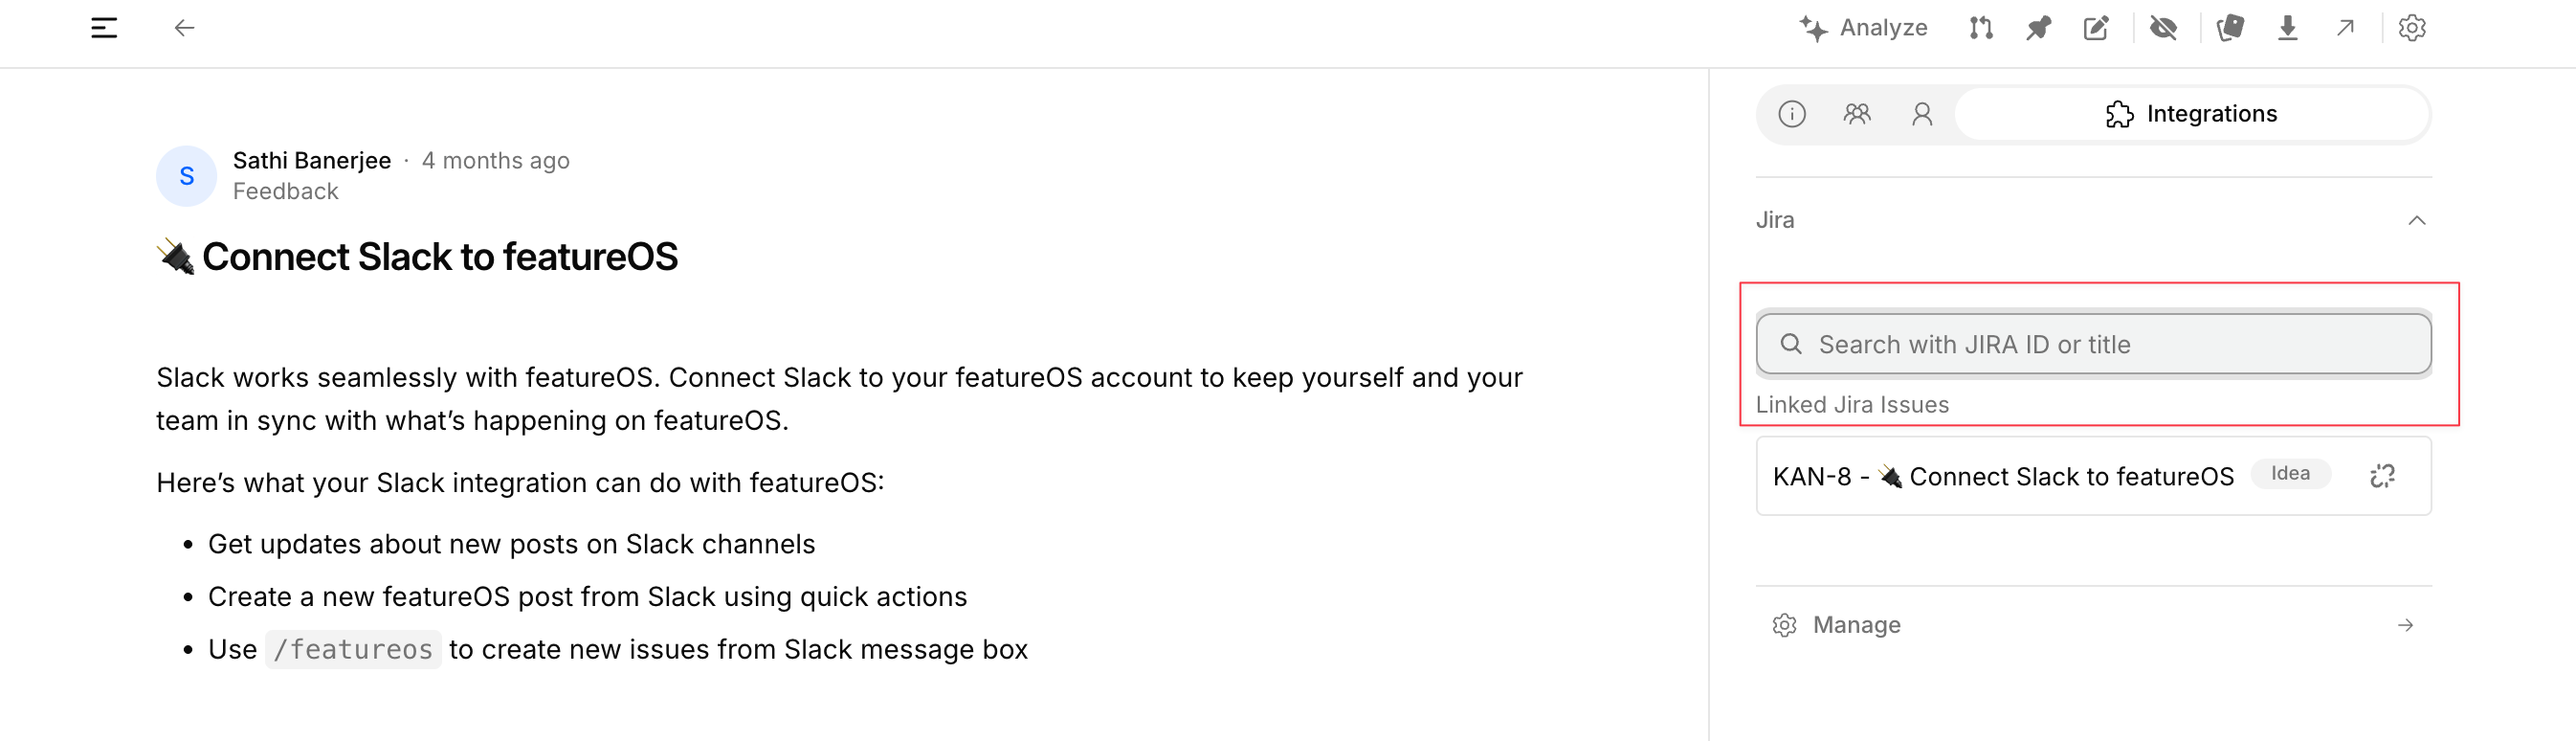
On any individual post page, use the Jira search bar and enter an issue key or title. The linked issue shows up under Linked Jira Issues.
Uninstalling
On FeatureOS
Go to Dashboard → Organization Settings → Integrations, click Configure on the Jira card, and click Disconnect at the bottom of the screen.
On JIRA
Navigate to your Jira home.
Open the Apps dropdown in the header.
Select Manage Apps.
Under User-installed apps, expand FeatureOS and click Uninstall.
On the confirmation popup, click Uninstall app.
Need more help?
Reach out to our support at [email protected] or submit a request on our support board! 😃
Was this helpful?