

Changelog visibility with segmentation allows you to show different product updates to different audiences based on the user segment they belong to. This ensures each user sees only the changelog that are relevant to them improving engagement.
Before you begin
Changelog segmentation is built on top of user segments. If you haven't set up your segments yet, you'll need to do that first before you can control changelog visibility.
Head over to the Complete Guide to User Segmentation to get that done, then come back here and continue from Step 2.
How Changelog Segmentation Works
Changelog segmentation applies to all three ways users can view your changelog:
a. Changelog Portal - Your standalone changelog page that shows filtered content based on the logged-in user's attributes.
b. Changelog Widget - The in-app changelog widget displays only relevant updates when embedded in your application.
c. Changelog Embed - Embedded changelog on your website or help center show segmented content based on visitor attributes or logged-in user data.
Setting Up Changelog Segmentation
Step 1: Create Your Segments
Segments are groups of users defined by their attributes, things like their plan type, role, or any custom properties you've already set up in FeatureOS. Once a segment is created, you can use it to control what each group of users sees in your changelog. For detailed guidance on creating segments, visit: Complete Guide to User Segmentation.
To create a user segment:
Navigate to Dashboard → Settings → People → User Segments → View All Segments.
Click Create Segment
Enter a segment name (e.g., "Enterprise Users", "Beta Testers", "Admin Roles")
Add filters to define who belongs to this segment:
Select a field from the dropdown (e.g., Plan Type, User Role, Custom Properties)
Choose an operator (equals, not equals, contains, etc.)
Enter the value to match against
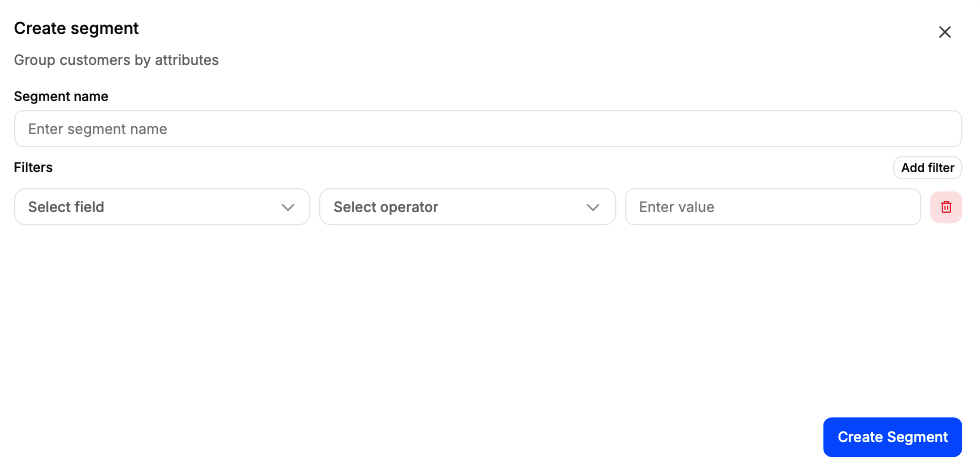
You can add multiple filters if needed by clicking Add filter again
Click Create Segment to save
Segment Rules Examples:
Enterprise Customers:
Plan Type = "Enterprise"Beta Program Members:
Custom Property: beta_access = truePaid Users (Any Plan):
Plan Type IN ["Pro", "Business", "Enterprise"]Step 2: Assign Segments to Changelogs
Once your segments are created, you can control which audiences see each changelog.
When creating or editing a changelog:
Open the changelog editor
Scroll to the Visibility Settings section
Choose your visibility option:
Everyone (Default): All users can see this changelog
Specific Segments: Only users matching selected segments can see this changelog
If you select Specific Segments:
Check the segments that should see this changelog
You can select multiple segments (users matching ANY of the selected segments will see the changelog)
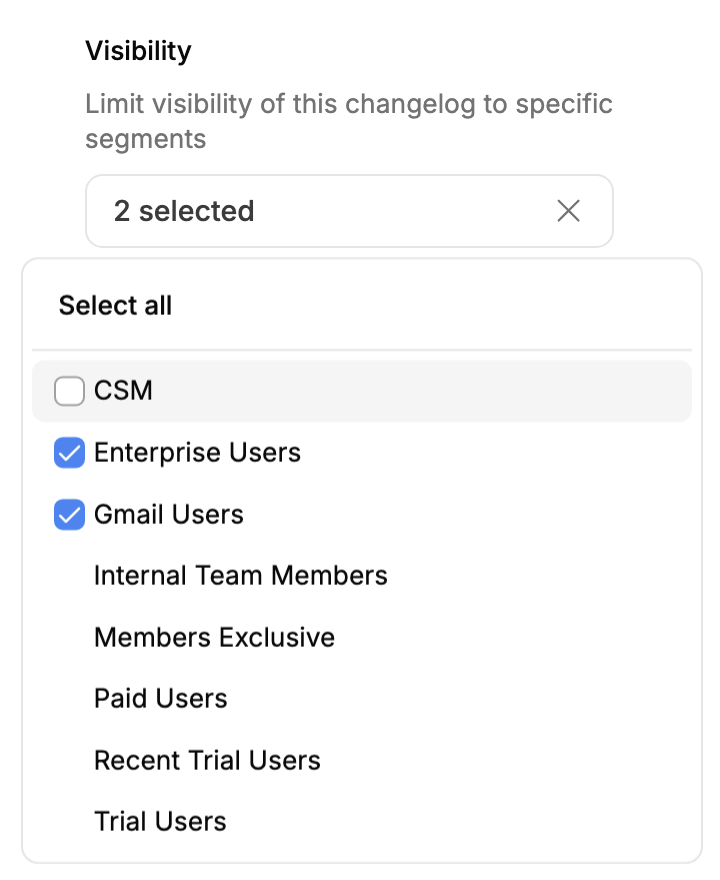
Preview to see which users will have access
Publish your changelog
Good to know
Segment assignments can be updated at any time, even after a changelog is published, the changes take effect immediately.
If you remove all selected segments from a changelog, it automatically becomes visible to everyone again.
Users who don't match any assigned segment won't see that changelog anywhere, not on the portal, not in the widget, and not in any embed.
You only need to set visibility once, it applies consistently across your changelog portal, in-app widget, and any embedded changelog automatically.
Need more help?
Reach out to our support at [email protected] or submit a request on our support board! 😃
Was this helpful?